Enjoy
your stay...
|
Enjoy
your stay...
|
|
|
|
TUTORIAL
8: Finishing Off
|
|
|||
|
|
|
I
want to get rid of the messy bottom of the CG by framing it. I need a
little extra room at the side, so enlarge the canvas by 100 pixels or
so: Image- Canvas Size. Create a new layer called "Boarder"
and make sure it's at the top of you layers tab , above the Line Art layer.
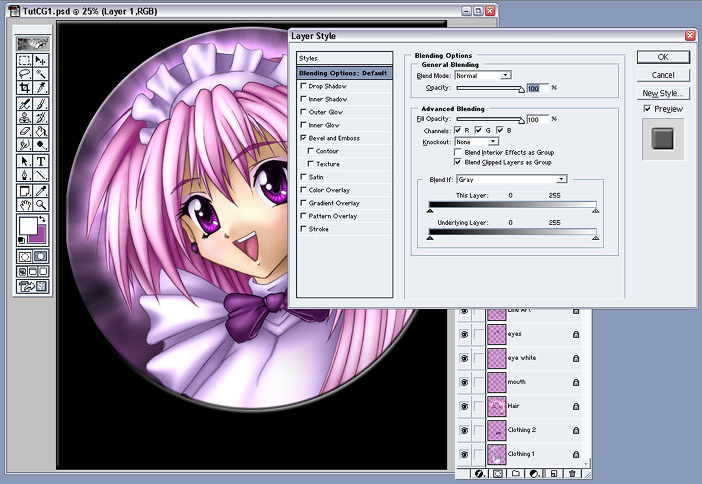
Add an embossed effect by double clicking the Boarder layer, which brings up the fx/styles tab (see Fig 26.). Go to the "Bevel and Emboss" style and select the Pillow Emboss option. For this effect I chose the following settings: Depth: 100, size: 35, soften: 12 and the rest of the setting are defaults.
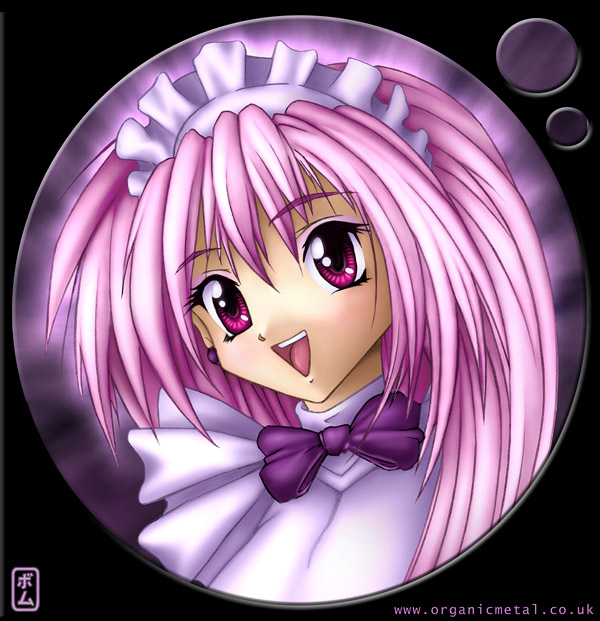
Finished off by adjusting eye hue, which I just felt would look a bit better if it was read! and I also I cut away a few extra circle details from the boarder in the top right corner for effect. I added my signature; "Bomu" and web URL so people know where the picture came from. And there you have it: a cool finished and framed CG ready for print or publishing on the web. Yay! (see Final CG.)
When Saving your final image for the web, flatten the image by clicking the small triangle in the top right of the Layers tab and Flatten Image. Note: It's always good to have an unflatten image too in case you ever need to make changes at a later date, or if you wish to print. Make sure the image is re-sized so it fits onto the screen. In this case I adjusted the size by 25%: Image -Image Size and kept aspect ratio checked. I saved the image as a .JPG, which are compressed picture formats. When Saving in PhotoShop, name the file and select to save it as a JPEG/ JPG, then a tab will appear asking you to select the quality. For the web it's hard to notice the difference between level 8 quality and level 12 quality, but I usually save at level 9 quality. When Saving for Print at a later time, you don't need to flatten the Image, although if you do it will save file space. This time don't adjust the image size this time and keep the file in the PhotoShop format PSD. Any time you wish to print the image, open it up in PhotoShop and -File - Print Options, which brings up a tab allowing you to re-size the image to fit on the paper etc. (Earlier Versions of Photoshop may not have this feature) Summary:
I hope you've found these tutorials useful to help you digitally colour your artwork. Many of the processes I've used are personal preference so feel free to experiment and find out what's best for you. Keep practising these techniques and you'll be well on your way to becoming a CGing pro!
|
||
|
Good
Luck!
|
|
|||
|
|
||||
|
All material used on this site is © of their respective owners and may not be used without the owner's consent. Organic Metal is copyright © 2000 - Present Ben Krefta. |