Enjoy
your stay...
|
Enjoy
your stay...
|
|
|
|
TUTORIAL
7: Rendering B
|
|
|||
|
|
|
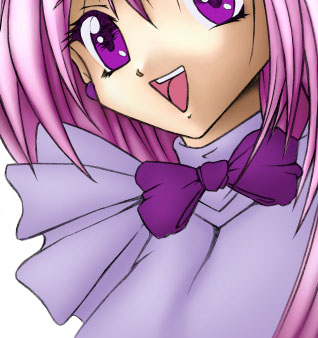
Add another even darker shade to create extra depth. I've added the darker tone where the folds reside- since light wouldn't be able to touch folds/ creases on the material (see Fig 20.). I will want the lighter material to look more shiny than the bow, so I add more contrast to the light and dark areas.
The skin looks a little too dark and brown, so I use the -Image -Adjust -Brightness/Contrast levels to alter the contrast once more. Since I wanted a pale shiny look to the light material I made it brighter as well. (See Fig 21.) Now the clothing's all done- we're nearly finished CGing!
Now I'll add the final details. I start by adding some shading to the mouth. (See Fig 22.) You can see I've made the tongue look a little more 3d by adding darker tones around the edge of the tongue and a few small light marks, which also help make the tongue look less dry. Now I can concentrate on the eyes, which are one of the most important parts of a portrait. I've added some slightly darker shadow to the tops of the eye whites- this is optional, but I think it all adds to making them look just that little bit more 3D and helps represent shadow cast from the eye lashes. With eye Iris' it's important that most of the time they are much darker at the top.. Almost black! Then lighter towards to bottom where you will show the iris colour- in this case purple.
To make the eyes really stand out I've used a much lighter purple and lightened individual 'segments' of the iris (see Fig 22.). I then went over these lightened areas with a small Dodge tool brush. When doing close up parts of the face, it's always good to zoom in so you can add all the details a lot easier.
Finally I added added some make-up to the character. This is optional, but I decided to make the cheeks a little more red/pink by adding a small bit of airbrush under the eyes. I did this on another layer also, just in case I made a mistake, I wouldn't have to re-colour the entire skin again! You can also see I added some purple eye shadow. I added this to the actual skin layer using a purple airbrush, but setting the tool mode to from "Normal" to"hue" or you could use "color". I also duplicated this layer just in case I made a mistake. Duplicating layers is always a safe thing to do and can be done easily by dragging the layer you want to duplicate in the layer tab onto the "New Layer" icon at the bottom of the Layers tab. The last touch is to colourize the actual line art on the Line Art layer. This makes the outlines blend in with the CG a little more. It's a subtle effect but does make a difference. Making sure the Line Art layer is selected and locked, select a dark brown colour, then use the paintbrush tool to go over the line art surrounding the skin only. Then select a dark pink and go over the line art surrounding the hair. Again, select a purple colour and go over the line art joining to the clothing(see Fig 22.). And that's it!
I
find you can always tell a good CG if, when you take away the Line Art
layer (click the eye icon next to the layer) you should still be able
to work out what you've painted underneath. In this case, despite being
a little rough around the edges, it looks pretty good! (see
Fig 18.)
Just one more thing to do before we can print out or publish our Finished CG... (See next tutorial) Summary:
|
||
|
|
||||
|
|
||||
|
All material used on this site is © of their respective owners and may not be used without the owner's consent. Organic Metal is copyright © 2000 - Present Ben Krefta. |